July 31, 2012

Pressure Cooker Chili - Take 2

     Hello!  It's Recipe Tuesday and today's recipe comes from the fantastic pressure cooker cookbook, Great Food Fast by Bob Warden (here).  If you have a pressure cooker but don't own this cookbook it's a MUST HAVE - delicious recipes with full page photos and easy to follow directions.
    The name of this dish is 5-Alarm Chili and if you're sensitive to spicy foods this may not be for you.  Aaron, who puts hot sauce on everything, claims this had mild heat... but I beg to differ.  Make sure you have a few slices of bread of plain tortilla chips to help cool your mouth.
     We did alter the recipe a bit to make it more on the healthful side.  Rather than 2 lbs of ground beef we used turkey.  We used 1 can of kidney beans rather than 1 1/4 cups of dry beans (too lazy to soak them plus they add extra cooking time).  Finally we chose to use a 4oz can of mild diced green chiles rather than 2 jalapeno peppers the original recipe calls for.

5-Alarm Chili
  • 1 can (15 oz) kidney beans, drained
  • 3 tbsp vegetable oil
  • 2 lbs ground turkey
  • 1 large red onion, chopped
  • 3 tbsp chili powder
  • 1 can (4oz) diced green chiles
  • 2 (15 oz) cans diced tomatoes
  • 1 (28 oz) can tomato sauce
  • 2 cups beef stock
  • 1 tbsp minced garlic
  • 2 tsp sugar
  • 1 tsp ground cumin
  • 1 tsp ground cayenne pepper
  • 1 1/2 tsp salt
  • 1/2 tsp black pepper
  • 1 (16 oz) bag frozen corn

1.  With cooker's lid off, heat oil on high (or brown) until hot.

2.  Place ground turkey and onion in cooker and cook until ground turkey has browned, about 10 minutes.

3. Stir in chili powder and chiles, cook additional minute

4. Add remaining ingredients, except corn.  Securely lock lid on pressure cooker and set for 8 minutes on high.

5. Let the pressure release naturally for 10 minutes before perfoming a quick release.

6. Set cooker to high (or brown) and stir in frozen corn kernels.  Let simmer for about 5 mintues before serving.  Top with a dollop of sour cream or a pinch of cheddar cheese (or both).  Enjoy!

July 27, 2012

Christmas Lodge

     Hello!  Today's card was inspired by a demonstrator challenge sponsored by my upline, Stella MacKay.  The only rule for the challenge was that all products used must be in the current Stampin' Up! catalog.  Since I have tons of Christmas cards to make each year I thought this challenge would work perfectly with one of my new favorite sets, Christmas Lodge.

     It may be hard to tell from the photo but I used scissors to rough up the edges of the Crumb Cake card stock on the image layer as well as the DSP layer to give it a little bit of texture.  The "flower" was created by punching out two flowers from the Boho Blossoms punch and layering them with a brad.

Stamps: Christmas Lodge, More Merry Messages
Ink: Crumb Cake
Paper: Crumb Cake, Very Vanilla, Cherry Cobbler, Neutrals DSP
Tools & Accessories: Scallop Edge Border & Boho Blossoms punches, brad, dimensionals

July 24, 2012

Pina Colada Cupcakes

     Yes, cupcakes!  Perusing the web I stumbled upon a recipe for pina colada cupcakes over at Pastry Affair (here). 
     I have to warn you, these are not virgin cupcakes.  Yes, I'm sure you could make them sans alcohol but really - who would want to?!
     The cupcake is incredibly dense and moist with just a hint of coconut and pineapple.  The frosting is, according to Aaron, the best frosting he's ever had, very light and adds just the right sweetness to the cupcake.  These would be a unique dessert at a summer BBQ.

Pina Colada Cupcakes
  • 8 oz can crushed pineapple
  • 1/3 cup coconut rum (I used Bacardi Rock Coconut)
  • 3/4 cup coconut milk
  • 2 tsp vanilla extract
  • 1 1/2 cups flour
  • Pinch of salt
  • 1 tsp baking soda
  • 1/2 cup butter, room temperature
  • 2/3 cup sugar
  • 3 eggs
  • 1 cup sweetened shredded coconut

1.  Preheat oven to 350.  Drain canned pineapple, reserve 1/4 cup juice and 1 cup of pineapple.

2.  In small bowl, whisk together pineapple juice, rum, coconut milk and vanilla extract.  Set aside.

3.  In medium bowl, whisk together flour, baking soda and salt.  Set aside.

4.  Using a stand mixer, cream together butter and sugar until ight and fluffy.  Add eggs, one at a time, beating well after each addition.

5.  Add milk mixture and flour mixture until just combined.  Gently fold in pineapple and shredded coconut.

6.  Fill cupcake liners 3/4 full and bake for 20-24 mintues.

Whipped Topping
  • 1 1/2 cups whipping cream
  • 1/3 cup powdered sugar

1.  In large bowl combine whipping cream and sugar.  Beat with an electric mixer until stiff peaks form, about 5 mintues.

2. Pipe onto cupakes. Store cupcakes in airtight container in refrigerator.  Enjoy!

July 20, 2012

A Tale of Two Cards

     Hello!  Today's card was inspired by Teneale Williams' Birthday Thoughts card over at her blog (here).  I love the idea of using a transparency to create a card - it gives the card such a unique look. 
     If you've never used a transparency to make a card there are a few things you need to remember.  First, when you fold the transparency I suggest using the Simply Scored scoring tool (or similar tool) and a bone folder.  This ensures a nice, crisp fold in the somewhat stiff transparency.  Second, each layer on the card needs a front and a back so that you can hide any tape or dimensionals.  Depending on how much card stock you use this could increase the weight of the card and you may need to add extra postage if mailing.
    I often ask my husband for his opinion on cards I create.  When he saw this card he felt that Christmas cards shouldn't be "see through" and encouraged me to make a second card not using a transparency.  "How about that 'coffee cake' paper, that would look nice" he said.  And wouldn't you know it - he was right!  The Crumb Cake card was defintitely a quick card to make and is beautiful on it's own.  But if you've got a bit more time and you're looking for a little "wow" this Christmas I'd go for the original transparency card.

Stamps: Rejoicing with You
Ink: Cherry Cobbler
Paper: Transparency, Very Vanilla, Cherry Cobbler, Crumb Cake
Tools & Accessories: Big Shot, Labels Collections framelits, Finial Press embossing folder (retired), Cherry Cobbler seam binding ribbon, Smootch Spritz, dimensionals

July 17, 2012

Blueberry Turnovers

     Hello!  It's Recipe Tuesday and today's recipe is one I found in the June issue of the magazine All You.  I've been looking for a way to use up the puff pasty that's been taking up space in our freezer so when I saw this recipe I knew I had to give it a try.  And I'm so glad I did... the first time I made these I believe Aaron's exact words were "Oh. My. Goodness.  These are freakin' awesome!". 
     These are incredibly quick and easy to make and, according to Aaron, should be made at least once a week!  The following recipe makes 4 turnovers, to make more simply double the blueberries and use the second puff pastry.  In this recipe I used frozen blueberries but once they're in season fresh ones would be the better choice.

Blueberry Turnovers
  • 1/3 cup blueberries
  • 2 tbsp sugar, plus 1 tsp
  • 1 sheet frozen puff pastry (1/2 of package), thawed
  • 1 egg

1. Preheat oven to 400.  In bowl combine blueberries and 2 tbsp sugar; mix to coat berries.  In separate bowl, whisk egg with 1 tsp water.

2.  On piece of parchment paper cut puff pastry into 4 equal squares.  Brush edges of pastry with egg wash.

3.  Spoon 1/4 of blueberries onto center of pastry.  Fold pastry diagnolly to form a triangle.  Using a fork, press edges to seal.  Repeat with remaining pastry.

4. Transfer turnovers to baking sheet.  Brush with remaining egg wash; sprinkle with sugar.  Cut small slit in top of each pie.

5. Bake until turnovers are golden brown, 20-25 minutes.  Allow turnovers to cool on wire rack for at least 10 minutes before serving (trust me on this).  Enjoy!

July 15, 2012

A Stamp Set for Just $5?!


That's right!  During July, you have the opportunity to purchase an exclusive stamp set, available only through this special offer!

Get the Reason to Smile stamp set (a $20.95 value) for just $5 when you spend $50 on any Stampin' Up! products.

For more info on this great promotion and to see images of the stamp set click (here).  But hurry, this offer ends July 31st!


July 13, 2012

Rejoicing with You on Vellum

     Hello!  It's Christmas in July!  Today's card was created with the new Rejoicing with You stamp set and is another quick and simple card that can be easily mass produced.
     It's hard to tell from the photo but the angel image was stamped in Elegant Eggplant on Whisper White card stock and is under a piece of vellum, giving it a soft appearance.  I then stamped the sentiment with Eggplant on White Vellum (pg 160, $6.50).  It's important to let the ink completely dry before moving on to the next step (unlike card stock, ink does not dry instantly on vellum).  The vellum was attached to the white CS using brads.

Stamps: Rejoicing with You
Ink: Elegant Eggplant
Paper: Elegant Eggplant, Whisper White, White Vellum
Tools & Accessories: Brads, dimensionals

July 10, 2012

Skinny Pina Coladas

     Hello!  What would summer be without a few cocktails on the deck with my husband?  Last summer our drink of choice was the Dirty Banana (yum!), this summer it's the Skinny Pina Colada.  And by "skinny" I mean somewhat low-cal and low fat, so there's very little guilt associated with drinking this adult beverage.  While it doesn't have the creamy consistency of a traditional pina colada it certainly tastes like one!
     This recipe comes from Carrots 'n' Cake (here).  Tina's recipe is spot on so I didn't change a thing!  Coconut water can be found in the bottled water isle of your grocery store and the rum should be easy to find at any well stocked liquor store.

Skinny Pina Colada (serves 1)
  • 2 oz Bacardi Rock Coconut Rum
  • 5 oz coconut water
  • 2 oz pineapple juice
1.  Combine all ingredients and ice in shaker and shake.  Strain into glass and garnish with pineapple or cherry, if desired.  Enjoy!

July 6, 2012

Quick and Simple Christmas

     Hello!  You'd think the first thing I'd order from the new SU! catalog would be a new stamp set, right?  Nope!  After seeing so many wonderful cards on SCS using Christmas Lodge I decided to order it and try a few cards of my own.
     Here's my first creation: a quick and simple card that can be easily mass produced.  The "snow" was created by coloring the card stock with a white gel pen.

Stamps: Christmas Lodge, Woodgrain
Ink: Soft Suede, white gel pen
Paper: Crumb Cake
Tools & Accessories: Corner rounder punch, dimensionals

July 4, 2012

A Birthday and the Blue Angels

     Happy birthday, America!  Our wonderful country was established on this day 236 years ago.  And what would our country be without the brave men and women who serve in our armed forces?

     This past weekend I had the opportunity to attend the Portsmouth Air Show featuring the Blue Angels.  If you're not familiar with the Angels they're an elite group of Navy fighter pilots who demonstrate their amazing ability to fly F/A-18 fighter jets through unique maneuvers.  I think the only thing I could utter during the jaw-dropping demonstration was "wow!"  If you ever get the opportunity to see an air show with either the Angels or the Air Force Thunderbirds I highly recommend it! 
They held this tight formation throughout the show
     In addition to the Angels we were able to get up-close to (and even inside) several Air Force and National Guard planes.  Representatives from all branches of the armed forces were there to answer any questions about the planes or serving in the service. 

Inside the cockpit of a C-130J
Spectators were allowed to walk around, in and under the planes on display.

     Even though it was incredibly hot (in the 90's) and I was exhausted at the end of the day, I'm looking forward to the next air show in 2014!


July 3, 2012

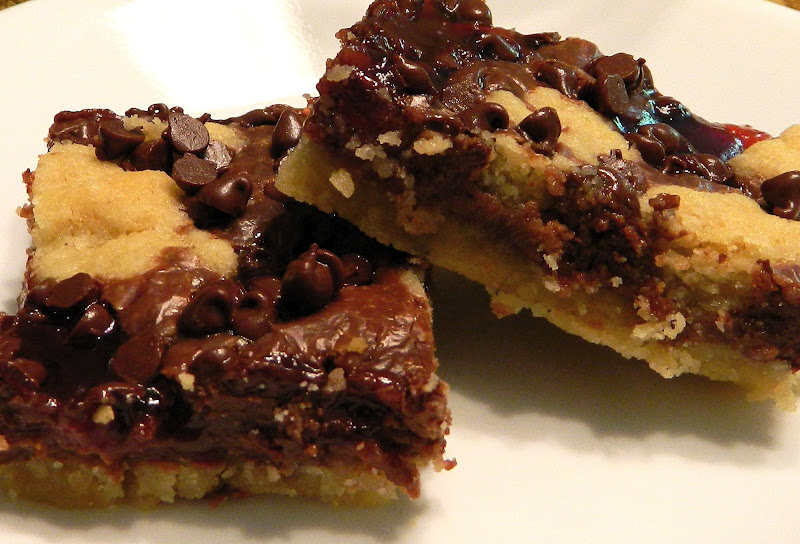
Chocolate Raspberry Crumb Bars

      Hello!  Today's recipe for Chocolate Raspberry Bars is one of my most requested treats.  I made these once for my husband to take into work a few years ago and they have been a constant request ever since.  The original recipe comes from the same book as last week's recipe, Nestle's Best-Loved Recipes.  These "jazzed up" shortbread bars are incredibly quick and easy to make and taste amazing.  Trust me, make these once and you'll be hooked!

Chocolate Rasberry Crumb Bars
  • 1 cup butter, softened
  • 2 cups all-purpose flour
  • 1/2 cup brown sugar, packed
  • 1/4 tsp salt
  • 2 cups semi-sweet chocolate chips, divided (I prefer mini chips)
  • 1 can sweetened condensed milk
  • 1/3 - 1/2 cup seedless raspberry jam

1. Preheat oven to 350. Grease 13"x9" baking pan.

2. Beat butter in large mixer bowl until creamy. Beat in flour, sugar and salt until crumbly.  Press 1 3/4 cups crumb mixture onto bottom of prepared baking pan; reserve remaining mixture.

3. Bake for 10-12 minutes, or until edges are golden brown.

4. Microwave 1 cup chocolate chips and condensed milk in medium bowl, uncovered for 1 minute.  Stir.  Chocolate chips may retain some of their shape.  If necessary, microwave at additional 10-15 second intervals, stirring just until chips are melted.  Spread over hot crust.

5. Sprinkle reserved crumb mixture over chocolate layer.  Drop teaspoonfuls of raspberry jam over crumb mixture (I tend to use more than 1/2 cup, I love raspberry jam!).  Sprinkle with remaining chocolate chips.

6. Bake for 25-30 minutes, or until center is set.  Cool in pan on wire rack.  Cut into bars and enjoy!

June 29, 2012

A Starfilled Thank You

      Hello!  Today's card was inspired by Kay Kalthoff's graduation card over at her blog Stamping to Share (here).  This card was incredibly easy to make but has such a 'wow' factor that any recipient would be honored to receive it.
     The stars were cut from a 4 1/8"x5 3/8" piece of Wisteria Wonder card stock, simply center the card stock on the die and run through the Big Shot.  The card stock is then adhered to the base of the card with dimensionals.
     I created quite a few of these as thank you cards for classroom volunteers (I love volunteers!) but just imagine the stars cut out of Night of Navy... wouldn't these make great 4th of July BBQ invites or  Memorial Day/Veteran's Day cards?!

Stamps: Teeny Tiny Wishes
Paper: Wisteria Wonder, Whisper White
Ink: Wisteria Wonder
Tools: Big Shot, Stars #2 (retired) & Bitty Banners Framelits dies, dimensionals, mini library clips (retired)

June 26, 2012

Caramel Chewies

     Hello!  Today's recipe for Caramel Oatmeal Chewies comes from a little cardboard cookbook that I've had for several years now, Nestle's Best Loved Recipes.  I love this little book, there isn't a single recipe that isn't absolutely delicious!  These bars quick and easy to make and are surprisingly quite filling (you only need one to satisfy your sweet tooth... ok, maybe two!)
     I have to be honest and say that I just couldn't wait to take a bite of these bars or take a photo of them so they do look a little goopy.  But after they've cooled just pop them in the fridge for an hour or so and they'll be easy to cut and take out of the pan.
     The original recipe calls for 2 cups of chocolate chips but I find that a bit too much and cut back to 1 1/2 cups.  As for the nuts, I use walnut but would love to try these with peanuts!

Caramel Oatmeal Chewies
  • 1 3/4 cups quick oats
  • 1 3/4 cup all-purpose flour, divided
  • 3/4 cup brown sugar, packed
  • 1/2 tsp baking soda
  • 1/4 tsp salt
  • 3/4 cup butter, melted
  • 1 1/2 cups semi-sweet chocolate chips
  • 1 cup chopped nuts
  • 1 cup caramel ice cream topping

1. Preheat oven to 350.  Grease 13"x9" baking pan.

2. Combine oats, 1 1/2 cups flour, brown sugar, baking soda and salt in large bowl.  Stir in
butter; mix well.  Reserve 1 cup of oat mixture; press remaining oat mixture onto bottom of prepared baking pan.

3. Bake for 12-15 minutes, or until golden brown.  Sprinkle with chocolate chips and nuts..  Mix caramel topping with remaining flour in small bowl; drizzle over nuts and chips.  Sprinkle with reserved oat mixture.

4. Bake fore 18-22 minutes, or until golden brown.  Cool in pan on wire rack; refrigerate until firm and easy to cut.  Enjoy!

June 22, 2012

Gingham Watermelon

     Hello!  Today's card is a CASE of Erica Cerwin's "Thanks" card over at her blog Pink Buckaroo Designs (here).  I loved everything about her her card and decided not to change a thing (except for the sentiment).  To create the gingham background I used the gingham technique from Two Crafty Girls.
     The "thank you" banner was created using the new Bitty Banners Framelits die (pg 191, $14.95).  It's so much easier to create the banners with this amazing set of dies!
     This would make a great BBQ invite during the summer months, just substitute the sentiment for a "You're Invited" or something similar

Stamps: Mouthwatering, Teeny Tiny Wishes
Paper: Whisper White, Melon Mambo, Lucky Limade, First Edition DSP
Ink: Lucky Limeade, Melon Mambo, StazOn Black, Basic Black Stampin' Write Marker
Tools & Accessories: Scallop Border & Blossom Bouquet punches, Big Shot, rhinestone brad (retired) 

June 20, 2012

Race Season Has Begun!

      For those of you who follow my blog you know that I'm a runner.  I usually post photos from races and give a little blurb about how I did (ok, it's really an opportunity for me to too my own horn - toot, toot!).  Unfortunately, I've been so busy lately that I haven't had a chance to fill you in, until now.  The race season for me officially began back on May 17th with the annual Concord Hospital 5k and another 5k on May 20 supporting the Kittery Fire Department.
     On June 2nd I participated in the annual Over the River and Thru the Woods 5k in Concord that benefited the SPCA.  Can I just say that I am dedicated.  It was POURING rain before, during and after the race but I still ran... it was for the animals, afterall.  Do you know how heavy wet, muddy sneakers are???  I didn't medal this year but I did beat last year's time by 3 seconds and came in 7th in my age group.

This is my happy face BEFORE the race
     In preparation for my big 10k at Gillette stadium this summer I participated in the 35th annual Market Square Day 10k (6.2 miles) on June 9th.  This was a race I had wanted to do for 3 years but I always seemed to miss the sign-up deadline.  My goal was to come in under 60 minutes and boy, did I!  My official finish time was 56:21 - woohoo!  The race course went right past my Auntie Jane & Uncle Bob's house so  they set up a little water station to support the runners.  My mom and dad were there to help out and snap the action photo ;)

Only 4 more miles to go!