February 28, 2012

Pressure Cooker Chili

     Hello!  It's Recipe Tuesday and today's recipe is a new favorite at our house, Pressure Cooker Chili.  It comes from PressureCookerDiaries.com, a great website I stumbled upon while looking for new pressure cooker recipes that didn't include chicken (have I mentioned how much I love my cooker?!).  If you have a pressure cooker or are looking to invest in one I recommend checking out this site; most recipes have videos to help you prepare and readers are encouraged to submit your own pressure cooker recipes.
     This recipe is incredibly easy to make and takes about 35 minutes from start to finish.  It's hearty, yet not too spicy, and perfect for a cold winter day.  For a healthier dish I used ground turkey rather than beef.  Aaron and I prefer thicker chili so I reduced the amount of water to 1 cup.

Pressure Cooker Chili
  • 1 lb ground beef or turkey
  • 2 tsp olive oil
  • 1 medium onion, chopped
  • 1 green pepper, chopped
  • 1 jalapeno pepper, seeded (optional)
  • 2 cloves garlic, pressed
  • 2 cans diced tomatoes, un-drained
  • 2 cans kidney beans, drained & rinsed
  • 3 tbsp tomato paste
  • 1 tbsp dark brown sugar
  • 2 tsp unsweetened cocoa powder
  • 1/2 tsp crushed red pepper
  • 2 tbsp chili powder
  • 2 tsp ground cumin
  • 2 tsp salt
  • 1 1/2 cup water
1.  Brown ground beef/turkey in pressure cooker.  Remove meat and drain fat.


2. Add onions, green peppers and jalapeno pepper to the cooker and cook on medium for about 8 minutes.  Add garlic and stir.


3.  Add remaining ingredients.  Stir well and lock the lid.  On high heat bring cooker up to pressure, then immediately reduce heat to maintain pressure.  Cook for 8 minutes.


4.  Remove cooker from heat and let pressure reduce naturally, about 10 minutes.  Enjoy!

February 26, 2012

Dying Baker's Twine


     Making a custom colored embellishment is easier than you might think.  Watch this video to learn how to create coordinating bakers twine using exclusive Stampin' Up! colors.

124262 White Bakers Twine, $2.95

125412 Twitterpated Designer Fabric, $9.95

February 24, 2012

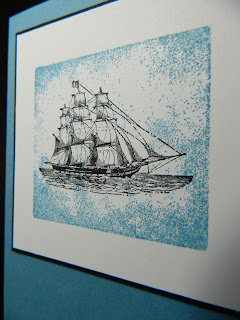
Blue Birthday

     Hello!  Today's card was inspired, or rather CASE'd, from serelewis's card The Clear Block Sea over at SCS (here).  I loved everything about her card so I changed very little, only the sentiment at the bottom.  I should mention that The Open Sea stamp set was originally featured in the Summer Mini catalog and normally I would have changed the image to reflect a current set.  However, I absolutely love this stamp set and I have my fingers crossed that it will make it into the 2012-13 Idea Book & Catalog (please, please, please!?)
   The technique used to create the blue background is very simple: use the clear block as a stamp!  Ink it up and stamp on paper just as you would with a traditional stamp. 
     This card was super simple to make and could easily be mass produced... hmmm.  Maybe I've found my masculine birthday card for the year!

Stamps: The Open Sea, Occasional Quotes (retired)
Ink: Marina Mist, StazOn Black
Paper: Whisper White, Marina Mist, Basic Black
Tools & Accessories: Stampin' Dimensionals

February 21, 2012

The {Best} Mac 'n Cheese, Ever!

     Hello!  It's Recipe Tuesday and today's recipe is all about comfort food.  Three-Cheese Macaroni Casserole, came from The Pressure Cooker Cookbook and is incredibly easy to make.  But I must warn you, this is not a low-cal, low-fat dish; it's all about the cheese and carbs!
     For two years or so Aaron and I have wanted a pressure cooker and my parents were kind enough to give us a 6-qt cooker for Christmas.  This is one of the best gifts ever.  Eh-ver. 
     Once I got over the initial fear of blowing the roof off our building (it is a pressure cooker, after all) I realized that this thing is beyond amazing....  This OMG-good dish took less than 15 to make from start to finish - no joke!   It's a wonder how we ever lived without this incredible invention, seriously!  (Sorta like when we finally gave in and bought a wireless router for the internet... man, we used to live in the stone age!)  Most pastas can be cooked in 6 minutes (without waiting for the water to boil), long-grain rice is done in 7, chicken in about 10 minutes and you can even make desserts in the cooker! 
    Just a note:  We added some leftover spiral ham with the onions and garlic but bacon would be great as well.


Three-Cheese Macaroni
  • 1 tbsp olive oil
  • 1 medium onion, finely diced
  • 2 garlic cloves, pressed
  • 2 cups elbow macaroni 
  • 3 cups chicken broth
  • 1 tsp salt
  • Pinch of black pepper
  • 1 cup half-n-half
  • 1 cup grated cheddar cheese
  • 1 cup shredded mozzarella
  • 1/2 cup grated fontinella cheese
  • 1/2 cup seasoned bread crumbs
  • 2 tbsp butter, melted
1.  Heat oil in pressure cooker over medium heat.  Add onions and garlic and saute for 2 minutes.  Add macaroni, chicken broth, salt, and pepper.  Secure lid.  Over high heat bring pressure up to high.  Reduce heat to medium to maintain pressure and cook for 6 minutes.

2.  Preheat broiler.  Release pressure according to manufacturer's directions.  Remove lid.  Drain and place in an over proof baking dish. 


3.  Stir half-n-half into macaroni and mix well.  Mix together 3 cheeses, reserving 2 tablespoons for topping, and add cheese mixture into macaroni.  Mix well.


4.  Toss bread crumbs with butter and sprinkle over top of casserole.  Sprinkle reserved cheese over casserole.  Broil until top is golden brown.  Enjoy!     

February 19, 2012

Create an Easel Card


Learn how to create an easel card with Brian from Stampin' Up!'s home office.

February 17, 2012

Suede Birthday

     Hello!  I am in constant need for masculine birthday cards and as soon as I saw Nancy Littrell's Field Flowers card over at SCS (here) I was inspired.  I loved her layout (SC341) but changed the colors theme and used the Nature Silhouette stamp set.  The background is one stamp so to make it multiple colors I used Stampin' Write markers to color directly on the stamp.  A little time consuming but well worth it in the end.

Stamps: Nature Silhouettes
Ink: Old Olive, Soft Suede
Paper: Soft Suede CS and DSP, Early Espresso, Whisper White
Tools & Accessories: Brads, Stampin' Dimensionals

February 14, 2012

Sweet Pressed Sugar Cookies

     Hello!  It's Recipe Tuesday and today's recipe for sugar cookies comes straight from the refrigerated section of my grocery store.  I {love} to eat sugar cookies but I'm not a fan of making them; enter Pillsbury Refrigerated Sugar Cookie dough and the Sweet Pressed Cookie Stamps from Stampin' Up!.
     The cookie press is super simple to use: simply slip silicone stamp on bottom of wooden handle and press into dough!  Silicone stamps are food-safe and dishwasher safe so clean up is a breeze.  Both the Holiday and Occasions presses can be found in the Occasions Mini Catalog for $16.95 (here).
     The cookies were sliced directly from the dough roll, about 1/4" each (I like thin cookies) and baked according to package directions. 
     I have seen several ways to use the cookie presses with cookies but I found the easiest to be pressing the cookies after they've been baked.  Let cookies cool for about a minute on baking sheet and then gently press the stamp onto cookies.  Decorate, if desired.
     If cutting thicker cookies, I recommend baking them for an additional minute letting them cool on the baking sheet for up to 3 minutes (the center of the cookie can be gooey) before pressing them.
Holiday Sweet Pressed Cookie Stamps, $16.95

Occasions Sweet Pressed Cookie Stamp, $16.95

February 12, 2012

Edgelits Dies and Coordinating Folders


Cut unique edges with Stampin' Up!'s new Edgelits.  They use the same thin wafer-like design as the Framelits, so you can see where you're placing the design before you cut.  Add embossing to the cut with the coordinating Adorning Accents Textured Impressions Embossing Folders.  Also coordinates with the Bordering on Romance stamp set.

125595 Adorning Accents Edgelits die, $9.95

125601 Textured Impressions Embossing Folders, $8.95

125483 (C) Bordering on Romance, $21.95

Check out the Edgelits and stamp set on pages 7 & 11 of the Occasions Mini (here).

To place an order check out my Stampin' Up! website (here).

February 10, 2012

Fashionable Hearts

     Hello!  Today's card was inspired by Chat Wszelaki's Simply Simple 86 card on her blog, Me, My Stamps and I (here).  I love everything about Chat's card and decided to CASE her card, using what I had in my stamping room.
     This card was quick and simple to make and I didn't have to ink a single stamp!  I chose to omit the sentiment so that this card could be used on other occasions besides Valentine's Day.

Paper: Whisper White, Neutrals DSP, Real Red
Tools & Accessories: Big Shot, Framelits Hearts Collection dies, Fashionable Hearts Embosslits die, 2 1/2" circle punch, grosgrain ribbon, pearl

February 7, 2012

Slow Cooked Sunday Dinner

     Hello!  It's Recipe Tuesday and the main course for today's recipe for comes from Food.com (love that site!).  Aaron and I picked up an eye of round roast at the food store for a super good price and he decided that it was my job to figure out how to cook it.  So I did a little research and found this fantastic recipe from KittenCalsKitchen (here).  It was incredibly easy to make and the best part is that you make the gravy along with the roast, no separate sauce pan and whisk needed!  This delicious, low maintenance dish is perfect for a cold, wintry Sunday dinner. 
     For a side dish I chose to use the pressure cooker and whip up some long-grain white rice, potatoes and carrots.  If you don't have a pressure cooker you can always cook the veggies in the slow cooker alongside the roast.

Slow Cooker Eye of Round Roast
  • 1 (3-4 lb) eye of round roast
  • 1 can cream of mushroom soup (undiluted)
  • 1 can beef broth, (reserving 4.5 oz)
  • 1 pkg dry onion soup/dip mix
  • 1-2 tbsp pressed garlic
  • 1 tbsp Worcestershire sauce
  • 1/4 cup flour
  • 1 tsp black pepper
  • 1 tsp garlic powder
  • 3 tbsp oil
1.  In small bowl mix together flour, pepper and garlic powder.  Dredge the round in the flour mixture.

2.  Heat oil in skillet on medium heat; brown roast on all sides.

3.  In large bowl mix together mushroom soup, broth (reserving 4.5 oz for later), dry soup/dip packet, Worcestershire sauce and pressed garlic.  Transfer to 5-6 qt slow cooker.

4.  Transfer roast to the slow cooker and generously spoon soup mixture over top of roast.

5.  Cover and cook on low for 6-7 hours, or until roast is tender.

6.  For thicker gravy, transfer gravy to saucepan and thicken with cornstarch and water.


     Using the reserved broth from the roast gives this side dish a hint of beef flavor.  If you don't have a pressure cooker you can still use the remaining broth in addition to water, just cook the rice according to package directions

Pressure Cooker Potatoes, Carrots and Rice
  • 4 large carrots
  • 10 small red potatoes
  • 1 cup long-grain white rice
  • 4oz beef broth (reserved from the roast)
  • 2 cups water
1.  Peel and cut potatoes and carrots into 2" pieces.  Place in pressure cooker.

2.  Add broth, water and rice.  Secure lid.

3. Over high heat bring pressure to high.  Reduce heat to medium and maintain pressure.  Cook for 7 minutes. 

4.  Reduce pressure according to manufacturer's directions.  Enjoy!

February 5, 2012

Designer Rosette


Create the paper rosettes you love in no time!  This die and your Big Shot do the cutting and scoring for you.  Features two designer edges for different rosette styles.  Cut rosettes up to 10" diameter.  Spacing between each fold is 1/2".

Check out the Bigz XL Designer Rosette die on page 28 of the Occasions Mini (here).

To place an order check out my Stampin' Up! website (here).

February 3, 2012

Love You Much

     Hello!  Today's Valentine's card is super simple and easy to make in large quantities, I think I made this in under 10 minutes.  This can definitely be filed under CAS (clean and simple). 
     I have very few Valentine's stamp sets so in an effort to use what I have (as opposed to buying more sets), I dug deep and pulled out my Well Scripted set.  I absolutely loved this set when it was available and wish Stampin' Up! hadn't retired it :-(  I also wanted to use up some pearls that I've had for ages and thought this was the perfect opportunity.

Stamps: Wells Scripted (retired, but I don't know why!)
Ink: Real Red
Paper: Very Vanilla, Real Red
Tools & Accessories: Pearls, Stampin' dimensionals

February 1, 2012

Game Day Munchies - Part 2

     The second dish I'll be making for Super Bowl Sunday is also from my Pampered Chef cookbook, All the Best.  The Taco Braid is by far one of my most favorite Pampered Chef recipes.  The flaky pastry is filled with a delicious filling that can be prepared in less thean an hour and will be a hit with guests.

Beef Taco Braid
  • 1 lb ground beef/ground turkey
  • 1 pkg taco seasoning mix
  • 1 1/2 cups shredded chddar cheese, divided
  • 2 tbsp water
  • 1 egg white, lightly beaten
  • 2 pkg redrigerated crescent rolls

Unroll crescent rolls and press seams together. 
1.  Preheat oven to 375.  Cook ground beef/turkey until no long pink; drain.  Stir in taco seasoning mix, 1 1/2 cups cheese and water.

Cut sides of dough into 8 strips.
2.  Scoop filling evenly over crescent rolls; twist dough to form braid.  Brush with edd white.  Sprinkle with remaining cheese.  bake 20-25 minutes, or until golden brown.  Serve with salsa, lettuce and sour cream.  Enjoy!
Lift one strip; twist one turn and lay across top of filling.  Repeat with remaining strips.

Serve warm.