August 31, 2012

Season's Greetings

     
     Hello!  Don't you just {love} it when you find a card that's perfect?!  That's what happened when I stumbled upon Jen Sannes card over at her blog, Simple and Sincere (here).  I loved her layout and I loved her colors so the only thing I changed was the stamp sets.
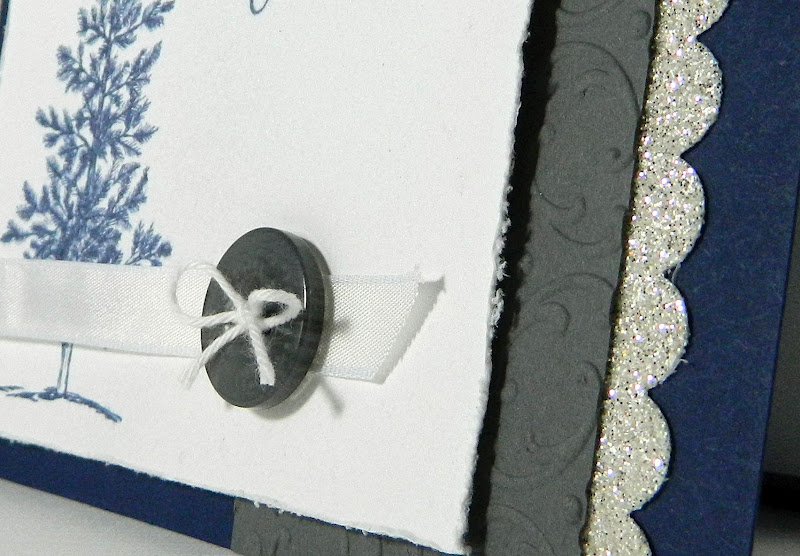
     It's hard to tell from the first photo but the Basic Gray card stock is dry embossed with the Finial Press embossing folder.


Stamps: More Merry Messages, Lovely As a Tree
Paper: Whisper White, Night of Navy, Basic Gray, Glimmer Paper
Ink: Night of Navy
Tools & Accessories: Big Shot, Final Press embossing folder (retired), scallop border punch, taffeta ribbon, button

August 28, 2012

Chocolate Marshmallow Brownies

     I believe this quote from Aaron says it all: "What's not to love about brownies, M&M's, marshmallows and peanuts?!"
     Today's recipe was adapted from a Best of Country: Brownies and Bars cookbook that I've had sitting around for a few years.  The original recipe calls for a box of Devil's Food cake as the brownie base but I've found that a box of the traditional brownie mix tastes much better.
     Besides tasting great and looking so colorful, the wonderful thing about this recipe is that it's so easy to make!  Four ingredients (plus those needed to make brownie mix) and you're done!  Another bonus is that this is one of those recipes that you can get creative with.  For example, try using Reese's Pieces instead of M&M's for a more peanut-ty taste.  Try mini chocolate chips rather than M&M's.  Or for a minty taste toss a few Andes Candies pieces on top (you may want to use walnuts rather than peanuts if you do this).  Oh, the possibilities are endless...  

Chocolate Marshmallow Brownies

  • 1 box chocolate brownie mix
  • 2-3 cups mini marshmallows
  • 1 cup M&M's
  • 1/4 cup salted peanuts


1.  Bake brownies according to package directions.  If possible, use a pan slightly larger than what you would normally use.  Rather than a 9x9" pan I used a 13x10".

2.  Remove brownies from oven and immediately sprinkle with marshmallows, M&M's and peanuts.  Bake 2-3 minutes more or until the marshmallows begin to melt.  I caution you on baking longer than 4 minutes.  I've found that over cooking the marshmallows makes them awfully sticky, making it difficult to cut the brownies into attractive and presentable squares without constantly rinsing off the knife.

3.  Cool on wire rack and cut into bars.  Enjoy!

August 26, 2012

Outdoor Journal


Watch as Emily Montoya from the Stampin' Up! home office shows you how to create a journal cover.

August 24, 2012

A Top Note Thanksgiving

     Hello!  Today's card was inspired by mamamostamps' "Day of Thanks" card over at SCS (here).  I've seen this layout/technique before but have never tried it.  In fact, I've had the Top Note Bigz die sitting, unopened, in my storage box for at least a year (gasp!).  So when I found Maureen's card I knew it was time to try both!
     I cut strips of Orchard Harvest DSP slightly larger than the die and adhered them to white card stock.  I then ran that through the Big Shot.

Stamps: Day of Gratitude, Teeny Tiny Wishes
Ink: Early Espresso
Paper: Crumb Cake, Whisper White, Orchard Harvest DSP
Tools & Accessories: Big Shot, Top Note Bigz die, Bitty Banners framelits, Naturals Designer buttons, linen thread, dimensionals 

August 21, 2012

Apple Chicken Quesadillas

     Hello!  Anyone else have that one lonely looking apple sitting in their fruit bowl that no one wants to eat?  It's a common occurrence at our house but I've found a recipe to use that sad looking apple.  Today's recipe for Apple Chicken Quesadillas was passed on to me by a co-worker but there are tons of similar recipes on the web.  Because these quesadillas are incredibly quick and easy to make this would be a great weeknight meal; just 5 ingredients and you're done!   Adding an apple to a traditional quesadilla was a new idea for me but a delicious one.  There's a slight crunch when you bite into the tortilla, the cheese and chicken blend together perfectly and the crisp, sweetness of the apple gives the quesadilla a unique flavor.
     The quesadillas are quick to make but to save even more time, we used meat from a rotisserie chicken (love that stuff!).  We also chose a nice baking apple rather than a hard, tart apple like Granny Smith.  I didn't put exact measurements for this recipe because it's really up to you how much chicken, cheese and apple to add to your quesadilla.  Aaron and I used two 10" tortillas and found that one per person was more than enough.

Apple Chicken Quesadillas
  • 4 8-inch flour tortillas (we used two 12")
  • Shredded or chopped cooked chicken
  • Monterrey Jack cheese, shredded
  • 1 apple, sliced thin
  • Salsa or taco sauce
1.  Heat large skillet on medium heat.  Place one tortilla in skillet and warm (you may want to flip it several times).

2.  Place cheese on 1/2 of tortilla, making sure you leave at least 1/2" edge of tortilla.  Add chicken and apple slices.  Fold tortilla in half and press down with spatula.  Lower heat to low-medium.  If you have enough room in your skillet you can add another tortilla to begin heating up.

3.  When cheese inside tortilla has melted (you may want to flip once or twice during cooking), remove from skillet to cutting board.  Open tortilla and drizzle with salsa or taco sauce.  Close tortilla and slice in half.  Enjoy!

August 19, 2012

Stampin' Emboss Technique


Watch as Shannon West from the Stampin' Up! home office shows you the faux metal embossing technique.

August 17, 2012

Sketch Challenge #331

     Hello!  Today's card was inspired by the Sketch Challenge #331 over at SCS (here).  I've been wanting to use up my Nautical Expedition DSP and knew this was the perfect layout for it.
     My hubby and I visited with childhood friends of his for several days on Martha's Vineyard earlier this summer.  On our last day they took us to a beach in Menemsha for the sunset.  We brought wine and cheese and watched the sun fall slowly into the ocean, it was beautiful!  As a way to thank his friends we'll be sending them this card along with a group photo we took on the beach.  
     Aaron and I have decided that when we win the lottery we're going to buy a summer house on the Vineyard... someday.

Stamps: The Open Sea, Teeny Tiny Wishes
Ink: StazOn Black
Paper: Not Quite Navy, Whisper White, Nautical Expedition DSP (retired)
Tools & Accessories: Big Shot, Bitty Banners Framelits die, circle brad (retired), bakers twine, dimensionals

Sunset on Menemsha Beach

August 14, 2012

Double Chocolate Mint Cookies

     Hello!  According to the McCormick ad I got this recipe from, these cookies are "the best thing to happen to chocolate chunk cookies since milk".  And they're right - these are absolutely delicious!  The cookies are soft and chewy with just a hint of mint flavoring.  Easy to make and even easier to eat... in fact, it's hard to eat just 1!  I made these for the first time on a day when we were having our tub regrouted and offered some to Joe, the regrouter.  I told him him this was a new recipe and that if he liked them he was welcome to help himself to as many as he'd like.  During the day I noticed he came back several times for samples, guess he liked them!

Double Chocolate Mint Cookies
  • 2 cups flour
  • 2/3 cup unsweetened cocoa powder
  • 1 tsp baking soda
  • 1/4 tsp salt
  • 1 cup butter, softened
  • 1 cup sugar
  • 2/3 cup firmly packed brown sugar
  • 2 eggs
  • 1 tsp peppermint extract
  • 1 cup chocolate chips
  • 1 cup coarsly chopped walnuts

1.  Preheat oven to 350. Mix flour, cocoa powder, baking soda and salt in medium blow; set aside.  In stand mixer, beat butter and sugars until light and fluffy.  Add eggs and extract; mix well.  Gradually add flour mixture on low speed until well mixed.  Stir in chocolate chips and walnuts.

2.  Drop dough by rounded tablespoonfuls about 2 inches apart on baking sheet.

3.  Bake for 8-10 minutes or just until cookies are set.  Cool on baking sheet 2 minute then move to wire racks to cool completely.  Store cookies in airtight container.

August 10, 2012

Watercolor Winter

     Hello!  Today's card was inspired by tessa's Elegant Christmas Card over at SCS (here).  This card has been sitting in my "favorites" folder at SCS for almost a year.  I loved everything about Tessa's card and the instant I saw Watercolor Winter stamp set in the Holiday mini I knew that would be the perfect set for this card!
     For a little drama I used the Big Shot and the Finial Press embossing folder for a layer behind the image.  Unfortunately, Finial Press is now retired but the Lacy Brocade folder on page 6 of the Holiday mini would be a beautiful replacement.  I should note that I turned the embossed card stock over so you see the debossed image.  I also added a little Crystal Effects to the leaves and berries to make them pop.


Stamps: Watercolor Winter
Ink: StazOn Black, Cherry Cobbler, Old Olive
Paper: Very Vanilla, Basic Black, First Edition DSP, Island Indigo
Tools & Accessories: Big Shot, Finial Press embossing folder (retired), seam binding ribbon, scallop edge border punch, Crystal Effects

August 7, 2012

Strawberry Cheesecake Ice Cream

     Hello!  Today's recipe comes from an ad for Philadelphia Cream Cheese I found in a "Taste of Home" magazine. I love cheesecake and I love ice cream so why wouldn't I love this?  Plus, I've been looking for an excuse to dust off my Cuisinart ice cream maker for about 5 years now (seriously, I haven't used it in over 5 years!).
     This recipe is incredibly simple to make and can be made without an ice cream maker, the mixture just needs to freeze overnight.  a few tips... The recipe calls for blending 1 1/2 cup of strawberries until smooth but we chose to blend only 1 cup with the Ninja (love that machine) and chopped the remaining 1/2 cup.  This way the ice cream had chunks of strawberries in it.  I added the graham crackers at the very end to reduce sogginess (is that a word?).  You can make this slightly lower in fat by using 1/3 reduced fat cream cheese rather than the full fat variety.  That's what I used and it made me feel 1/3 less guilty about eating a second bowl!  And get creative, this doesn't have to be just ice cream... turn it into an ice cream pie by pouring mixture into graham cracker crust and freezing for 8 hours.  Top with a dollop whipped cream and a drizzle of chocolate sauce and you've got one amazing pie!
      But here's the important part - the taste.  It is absolutely amazing - thick and rich, just like a piece of cheesecake!  I sprinkled some crushed graham crackers on top to give it a little extra crunch, and had I thought of it I would have saved some of the berry puree and drizzled that on top as well!  Guess I'll have to make another batch and give it a try!

Strawberry Cheesecake Ice Cream
  • 8 oz cream cheese, softened
  • 1 can (14 oz) sweetened condensed milk
  • 1/3 cup whipping cream
  • 1 1/2 cups fresh strawberries
  • 3 graham crackers, coarsely chopped

1. Mix cream cheese, condensed milk and whipping cream in bowl with hand mixer until well blended.  Freeze 4 hours, or until almost solid.  **If using an ice cream maker I would only freeze for 3 hours, we found it too thick when frozen for 4.

2.  Beat cream cheese mixture with mixer until creamy.  Blend berries in blender until smooth.  Add to cream cheese mixture with chopped graham crackers; mix well.  Freeze 8 hours or until smooth.

**If using ice cream maker, add cream cheese mixture and berries to machine.  Mix for 20 minutes.  Add chopped graham crackers and mix for another 1-2 minutes, or until well blended.  Serve immediately (consistency will be of soft serve) or freeze 2 hours or until firm.

3.  Remove dessert from freezer 15 minutes before serving; let stand at room temperature to soften slightly before scooping into dishes.  Top with chopped graham crackers.  Enjoy!

August 3, 2012

Little Bundle of Fur

     That's exactly what my aunt and uncle recently adopted!  Frankie is an orange tiger who officially joined the family back in June.  As a way to say congratulations I sent the happy family a card.  The original inspiration came from jaydeestamping over at SplitCoastStampers (here).  I loved everything about her card and decided to only change the colors (to match the kittens, of course!).


Stamps:  C is For Cat (retired)
Ink: Pumpkin Pie, StazOn Black
Paper: Whisper White, Pumpkin Pie
Tools & Accessories: 1 1/4" square punch, dimensionals