Hello! Today's card is a quick and simple card that would be perfect for a Christmas "thank you". I cannot take credit for this card but I can't seem to find the original inspiration... If you know where it came from please let me know so I can give credit!
Stamps:Teeny Tiny Wishes Paper:Whisper White, Gumball Green Ink:Gumball Green Tools & Accessories:Postage stamp, Merry Minis and 1" square punches, dimensionals
Hello! Today's card is CASE'd from Debra Currier's blog ARTfelt Impressions (here). If you haven't checked out Debra's blog I highly recommend it, she's so talented! And I have to admit that just like last week's card, I {loved} everything about her card and changed nothing!
Stamps: Teeny Tiny Wishes Ink:Cherry Cobbler Paper:Crumb Cake, Very Vanilla, Old Olive, Cherry Cobbler, Silver glimmer paper, Festival of Prints DSP Tools & Accessories:Postage stamp, 1" square and Merry Mini's punches, seam binding ribbon, dimensionals
Hello! Today's card was inspired by Debra Currier's CAS(E) This #5 card over at her blog ARTfelt Impressions (here). I loved absolutely everything about her card and used what I had in my craft room to CASE her creation.
Stamps:Christmas Greetings (retired) Ink:Riding Hood Red Paper:Very Vanilla, Riding Hood Red, Old Olive, Silver glimmer paper Tools & Accessories: Merry Mini's punch pack, taffeta ribbon, dimensionals
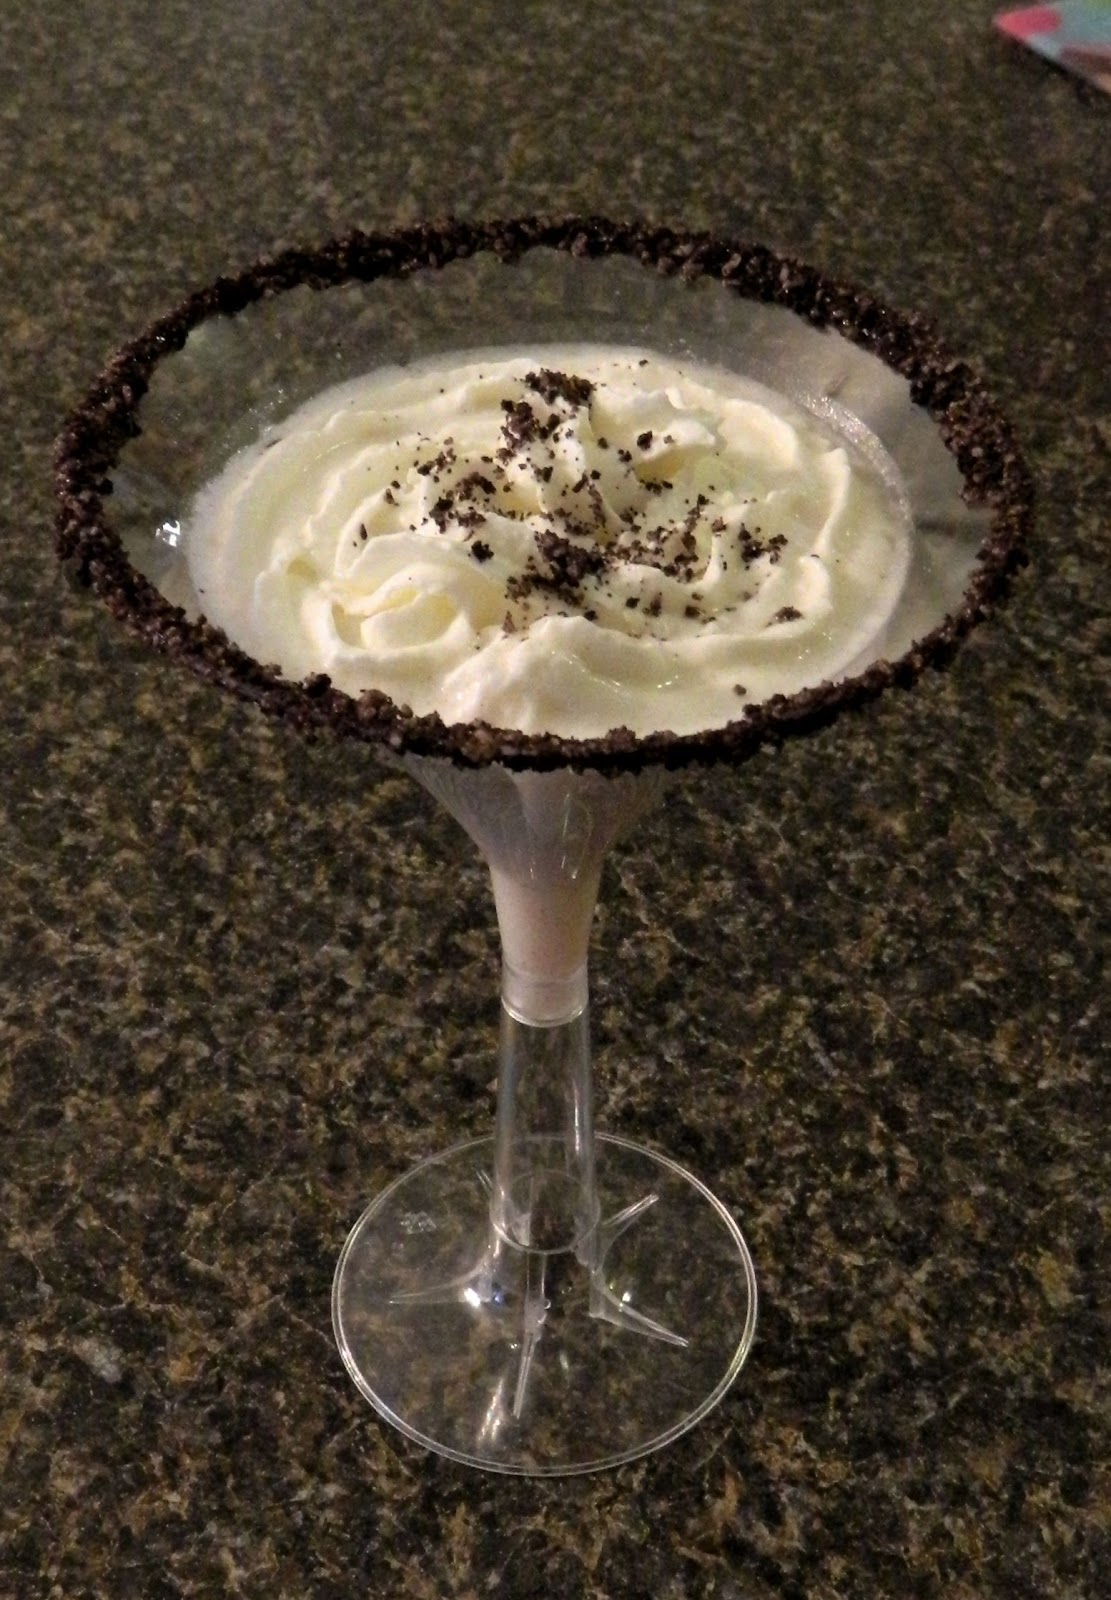
Hello! Looking for an adult drink to serve at your Christmas party this season? Look no further - I've found it! And you'll be happy to know that I've already taste tested this concoction (several times) and I can personally guarantee that it not only tastes delicious but it will be in instant hit at your gathering. The recipe calls for Pinnacle Whipped Vodka which I found easier to locate in the liquor store than the JELL-O Oreo pudding mix. I looked behind every single box of pudding mix in that aisle and eventually conceded that my grocery story was out of the all-important Oreo mix... So I substituted white chocolate pudding mix and to be honest you'd never taste the difference (just add a few Oreo crumbs to the shaker and you're good to go). You can make this drink semi-skinny by using skim milk rather than full fat milk or cream. The drink comes out a little thinner and tastes about the same, just a little less creamy. But really, who sticks to their diet during the holidays anyways?! If you're going back for a second helping of dinner or dessert at a party you might as well go all the way and have the full-fat martini... And one more thing... keep in mind that this is definitely a sipping drink!
Oreo Martini (1 drink)
1/3 cup milk or cream
1/4 cup Pinnacle Whipped vodka
1 1/2 tsp JELL-O Oreo or white chocolate instant pudding mix
Chocolate syrup
Crushed Oreo's
Whipped cream
1. Mix milk/cream, vodka and instant pudding mix in shaker container with ice. Shake for 30 seconds. 2. Dip rim of glass in chocolate syrup, then in Oreo crumbs. 3. Strain drink into glass, top with whipped cream. Enjoy!
Hello! Today's card was inspired by Nance Lempinen-Leedy's Triple Treat card over at her blog, Canopy Crafts (here). I {loved} everything about her card and decided to change only the sentiment. While stunning to look at, this technique is incredibly simple. Cut three pieces of Vanilla card stock, adhere with removable glue dots in layers and stamp! Carefully remove the Vanilla layers and adhere to Artichoke card stock. It's ok if the stamped image doesn't stamp 100%, the edges will be disguised with the colored card stock.
Stamps:Watercolor Winter, Rejoicing with You Ink:Cherry Cobbler, Riding Hood Red Always Artichoke Paper:Very Vanilla, Always Artichoke
Hello! Today's recipe comes from Bakeat350.blogspot.com (here). If you've never been to Bridget's blog I highly recommend it, she's so talented! I wish I had the patience and dedication to cookie decorating that she does! I have to clarify one thing... Bridget calls her cookies "Butterbeer Cookies", not butterscotch glazed cookies. When I brought them into school for my coworkers I had waaay too many questions about what kind of beer I added to the glaze and had to explain at least 15 times that there is no beer in the glaze or the cookies. So I changed the name. But that's all I changed. I tried to make mine look pretty, in the shape of a pumpkin and a leaf, but once I got the gooey glaze on they turned into brown blobs. But they are so buttery good that after one bite I don't think anyone will mind how they look! Butterscotch Glazed Cookies
1. Preheat oven to 350, line cookie sheets with parchment paper. 2. Cream butter and sugar. Add egg, butter flavoring and vanilla extract; mix well. 3. Gradually add flour and baking powder and beat until just combined (the dough will be very thick at this point). 4. Roll dough on a floured surface to about 1/4" thick and cut into shapes. Bake for 9-12 minutes, depending on thickness of cookie. Let cool for 2 minutes then transfer to a cooling rack. Butterscotch Glaze
2/3 cup butterscotch chips
1/8 cup evaporated milk
1 tbsp corn syrup
pinch of salt
1. Place all ingredients in a double boiler with simmering water. Heat until completely melted. 2. Place cookies on wire cooling rack and pour glaze over cookies. You may want to spread the glaze with a knife for even distribution. Enjoy! **I doubled the glaze recipe to make sure I had enough to cover the 2 dozen cookies. There was a bit left over for "taste testing".
Around the holidays, people are always looking for cute ways to package little treats and gifts for co-workers, teachers, neighbors and friends. At 20% savings, holiday packaging bundles are an affordable and adorable solution. Simply add a treat or gift and assemble. Trimmings & Tags Bundle (132769, $13.50) Includes:
Gusseted Cellophane Bags (25 bags, 5"x3"x11-1/2")
Snow Festival Designer Printed Tags (25 double-sided tags)
Cherry Cobbler 1/4" Sweater Trim (10 yards)
Petite Treats Bundle (132770, $13.50)
Includes:
Glassine Bags with die-cut edges (10 bags; 3"x5"11-1/2")
Handmade Holidays Stitched Felt (8 pieces)
Gumball Green 3/8" Stitched Satin Ribbon (10 yards)
Hello! Today's card was inspired by the bag on page 7 of the Holiday Catalog. I loved the idea of using scallop circles to create a Christmas tree and thought I'd give it a try on a card. The best part about making this card was using up little scraps of paper that I've had hanging around. As with last week's card, this is another quick and simple card that could easily be produced in large quantities!
Paper:Crumb Cake, Cherry Cobbler, Gumball Green, Early Espresso, Be of Good Cheer DSP, silver glimmer paper Tools & Accessories: 1 1/4" scallop circle, 3/4" circle and Merry Mini punches, bakers twine
Hello! Today's recipe come from the amazing blog, Cookies and Cups (here). I love peanut butter cups and I love chocolate so what's not to love about this recipe. Oh, did I mention that there are only 4 ingredients?! These cookies look and taste like you spent all day baking but no one has to know that these take less than 15 minutes to prepare! Even though the cookie is made with a cake mix the cookie is soft but not "cakey". The mini peanut butter cups break up when you're mixing the batter letting little gobs of peanut butter melt thought the cookie. And can I just say that after tasting just one cookie, I decided that this batter will be the batter I use for all chocolate cookies. It was SO simple! Just imagine substituting the peanut butter cups with chocolate chips and walnuts. Or you could try white chocolate chips and macadamia nuts... Or how about Andes mint candies? Oh, the possibilities are endless!
Peanut Butter Cup Chocolate Cookies
1 pkg chocolate cake mix
2 eggs
1/3 cup vegetable or canola oil
8 oz mini peanut butter cups (caution: these are easy to eat by the handful!)
1. Preheat oven to 350. Line cookie sheet with parchment paper. 2. Using mixer, combine first three ingredients. Add mini peanut butter cups and mix until incorporated (batter will be thick and peanut butter cups will break apart). 3. Drop by rounded tablespoon on cookie sheet. Bake for 8-9 minutes. Cool on cookie sheet for several minutes before moving to wire rack. Enjoy!
Hello! Today's card was inspired by marmie43gs' Day of Gratitude card over at SCS (here). I loved her layout and decided just to change the color combo. I ordered a pack of the Festival of Prints DSP when the Holiday Catalog came out back in August but this is the first card I've made with it. I absolutely {love} the prints and colors, they're beautiful!
Stamps:Day of Gratitude, Teeny Tiny Wishes Ink: Island Indigo, More Mustard, Old Olive, Cajun Craze Paper: Very Vanilla, Island Indigo, More Mustard, Old Olive, Cajun Craze, Festival of Prints DSP Tools & Accessories: Square and corner rounder punches, button, linen thread, dimensionals
Uh, I believe these are the best tasting brownies I've ever made or eaten. How could they be bad when there's peanut butter (I'm sure you're aware of my love of all things peanut butter), fluff all on a chocolate brownie - why didn't I think of this years ago?! Aaron and I were a little bored during Hurricane Sandy a few weeks back so why not grab a glass of wine and whip up a batch of brownies?! We had a box of brownie mix, tons of peanut butter (thanks to Aaron stocking up for the hurricane) and some Fluff that was just begging to be used. These brownies are incredible. The peanut butter and fluff mixture has slightly crunchy crust but is soft and chewy underneath. I prefer boxed brownies that are "fudge-y" and used an 8x8 brownie pan to ensure that this batch was dense and moist. While these taste great at room temperature Aaron highly recommends serving warm with a scoop of vanilla ice cream! Peanut Butter & Fluff Brownies
1 box brownie mix
1 cup smooth peanut butter (full fat)
1 - 1 1/2 cup Fluff
1. Preheat oven and prepare brownies according to box directions. Pour batter into 8x8 pan. 2. In microwave-safe bowl, combine peanut butter and Fluff. Microwave until soft, approximately 20-30 seconds. Gently mix together ingredients, making sure not to fully combine (you'll want to see the colored swirls). Carefully pour peanut butter mixture over brownies, swirling with knife.
3. Bake brownies according to box directions. Let cool for 1 hour. Slice and serve with a dollop of ice cream. Enjoy!
From November 19-28 Stampin' Up! will be holding an Online Extravaganza! During these 10 days only, you can get incredible discounts-up to 50% -on some of your favorite products!
In addition, there will be three products 20% off for 24-hours only on both the first and last days of Online Extravaganza-our very own doorbusters!
To view a complete list of all discounted items click (here) To place an order 24 hours a day visit my website (here)
With Talking Tag, you can send a gift that is uniquely you. Talking Tag is a message label you can attach to cards, invitations, gifts . . . anything! Personalize birthday cards, Christmas gifts or even record quick instructions for a project. Now your pictures really can say a thousand words!
How to Buy Talking Tags:
Buy 'em by the sheet! You get 10 tags for just $7.95 (item 129723).
How to record a voice message:
Download the FREE TalkingTagT App on you smartphone from talkingtag.mobi, iTunes® or Google PlayT.
Adhere the message tag to your card or gift.
Open TalkingTagT App and scan the code.
Record your message (recording starts immediately, so make sure you're ready!).
You will have the opportunity to listen, re-record, cancel, or confirm your message after you've completed recording it. Each label allows up to 60 seconds of a greeting, song, or product message.
To play the message, recipients will need to download the app and scan the code. Messages are saved for two years, so they can listen to it over and over.
Due to our partnership with Sizzix, we are pleased to be able to offer a test run of the Texture Boutique Embossing Machine in our North American markets. We have 4,000 available to be sold only while supplies last. If this product test goes well, we may offer the Texture Boutique again in the future.
The Texture Boutique works with Textured Impressions Embossing Folders to transform ordinary card stock, paper, metallic foil, or vellum into an embossed, textured masterpiece. This machine embosses only; it does not die cut. Because this is a product test, the Texture Boutique is not branded with the Stampin' Up! logo. It comes in Sizzix packaging and is the same color and design that is sold in stores. We recommend you read the included instructions before using the Texture Boutique.
'Tis the season of giving, and the Texture Boutique makes a wonderful gift for anyone who wants to create their own elegant embossed art. To help you with your gift-giving needs, we're offering a special value bundle that saves you $5.90. If you prefer, you can also purchase the Texture Boutique alone. Looking for stocking stuffers? Pick up some additional embossing folders.
Texture Boutique Bundle Item 132700 $39.95 (a $45.85 value) Includes:
Texture Boutique Embossing Machine, 1 Pair of Standard Embossing Pads, 1 Mylar Shim
Hello! Today's card was one that was made out of scraps. I cut out too many leaves and had a bit of extra ribbon laying around and couldn't bear to throw any of it out. In place of the Leaves #2 die, which is retired, you could use the Autumn Accents Bigz Die from the Holiday Catalog.
Stamps:Teeny Tiny Wishes Ink: Early Espresso Paper:Crumb Cake, Cajun Craze, More Mustard, Lucky Limeade Tools & Accessories: Big Shot, Leaves #2 die (retired), Square Lattice embossing folder, grosgrain ribbon (retired), linen thread, button