Showing posts with label recipe. Show all posts

April 30, 2013

White Chocolate Cupcakes with Truffle Filling


     It's been a while but Recipe Tuesday is back!  I gave up chocolate and sweets for Lent and couldn't bare the thought of baking without being able to taste test the recipe.  Now that Easter is over and most of the chocolate has been eaten I decided to get back into baking with this Pampered Chef recipe (here).
     I have a healthy fear of a few things: spiders, heights, drinking expired milk and baking with egg whites.  Not sure what it is but I've never been interested in exploring the world of egg whites or meringues... probably because I'm afraid my peaks will be too soft or too stiff and the entire recipe will be ruined.  But thanks to this recipe I'm slowly overcoming my fear.
     There are quite a few steps in this recipe and I used several bowls but it's well worth it.  The cupcake is dense yet very moist (due to the melted Lindt ball) and not too sweet.  The frosting is buttery soft with just a hint of white chocolate.  I found that the recipe makes enough frosting for 24 cupcakes, you could probably cut the recipe in half and still have enough.

White Chocolate Cupcakes with Truffle Filling   

  • 1 3/4 cups cake flour
  • 2 tsp baking powder
  • 2/3 cup whole milk
  • 1/2 tsp pure vanilla extract
  • 4 egg whites, room temperature
  • 6 tbsp butter, softened
  • 1/2 cup granulated sugar
  • 1/4 sour cream
  • 12 round white chocolate truffles (Lindt balls)


1. Preheat oven to 325; place paper liners in wells of muffin pan.  Whisk flour and baking powder together, set aside.  Combine milk and vanilla extract, set aside.  In mixing bowl, beat egg whites on high speed with electric mixer until stiff peaks form.  In another bowl beat butter and sugar on medium-high speed until fluffy; beat in sour cream until smooth.

2.  On medium speed, add flour mixture in three additions, alternating with milk mixture in two additions, mixing until smooth.  Whisk in one-third of the egg whites with a whisk.  Fold in remaining egg whites using whisk.  Using a large scoop, divide batter evenly among liners.  Bake for 17-20 minutes or until toothpick comes out clean.

3.  Immediately cut an "X" into top of each cupcake and insert one truffle until it is flush with the top of the cupcake.  Cool for at least 30 minutes (truffle will melt into cupcake). 

Frosting

  • 6 oz white chocolate for baking (3/4 cup white chocolate chips)
  • 1 pkg cream cheese, softened
  • 1/4 cup butter
  • 1/2 tsp vanilla extract
  • 2 cups powdered sugar

1.  Place white chocolate in microwave safe bowl and microwave until melted, stirring every 30 seconds.  Let stand 3 minutes or until slightly cooled.

2.  In mixing bowl, combine chocolate, cream cheese butter and vanilla and beat on medium speed until well blended.  Slowly add powdered sugar; beat well.

3.  Frost cupcakes.  Enjoy! 

April 2, 2013

Grasshopper Mint Cookies


     Hello!  Today's recipe is from the blog Six Sister's Stuff (here).  Aaron is a huge fan of mint chocolate cookies (i.e. Thin Mints) and I couldn't resist giving these a try, especially since the main ingredient is chocolate cake mix!  The cookies are soft and the frostings are creamy and delicious but, a little on the rich side (which isn't a bad thing, right?!).  Make sure you have a tall glass of milk to wash these down with!
     *Note:  I did find that I had way too much mint and chocolate frosting left over at the end of the baking process (I know, what a shame!).  I think cutting the original recipe for the frostings in half or baking two batches of cookies would solve the problem.  But so would a bowl and a spoon...

Grasshopper Mint Cookies

  • 1 box Devil's Food cake mix
  • 1/2 cup oil
  • 2 eggs
1.  Preheat oven to 350.  Line cookie sheets with parchment paper.

2.  Combine all ingredients in medium bowl.  Drop dough by tablespoonful onto prepared cookie sheet.  Bake for 7-10 minutes.

Mint Frosting

  • 1/2 cup butter, softened
  • 2 tbsp milk
  • 2 cup powdered sugar (I ended up using an additional cup)
  • 1 tsp peppermint extract
  • Green food coloring (optional)

1.  Mix together all ingredients.  You may need to add more powdered sugar

2.  Spread on cookies

Chocolate Topping

  • 2 1/4 cup semi-sweet chocolate chips
  • 3/4 cup butter

1.  Melt chocolate chips and butter together in microwave or over double-boiler.

2.  Spread melted chocolate over cookies.  Let frosting harden for about a hour before serving.  Enjoy!

March 26, 2013

Quick Coconut Macaroons


     Hello!  Today's recipe comes from the March 2013 issue of Real Simple.  I've made coconut macaroons before (here) but this has to be the easiest recipe for this delicious cookies that I've seen - it can be done in one bowl with 5 ingredients!
    These little cookies are soft on the inside with the slightest  crunch from the baked coconut.  And did I mention they're gluten-free?!  I had leftover chocolate from a batch of Grasshopper Mint Cookies that I had just made and couldn't resist dipping a few of the cookies in it.  Oh. My.  (and I thought they couldn't get any better!).

Coconut Macaroons

  • 3 large egg whites
  • 1/2 up white sugar
  • 1/2 tsp vanilla extract
  • 1/4 tsp salt
  • 1 14oz package sweetened shredded coconut (about 5 cups)


1.  Preheat oven to 325.  Line baking sheets with parchment paper

2. Whisk together egg whites, sugar, vanilla and salt in medium bowl until glossy and the sugar is almost dissolved.  Fold in coconut, stirring until evenly combined.

3. Using a small ice cream school, drop batter in mounds 1 inch apart on cookie sheets.  Bake, rotating the sheets halfway through, until brown, 20-25 minutes.  Let cool completely on wire racks. 

4.  If desired, drizzle or dip cooled macaroon in dark chocolate.  Enjoy! 


March 5, 2013

Milky Way Cookies


     Hello!  Today's recipe for Milky Way Cookies comes from the blog I Heart Nap Time (here).  These cookies are crazy good!  A soft, chewy, chocolately, caramel-y cookie - yum!  I knew the cookies were going to be amazing when I couldn't stop sampling the batter...  
     I had difficulty finding the mini Milky Ways that Jamielyn recommends and ended up using a bag of the "Fun Size".  I wanted to keep the candy bar pieces bite size and keep the caramel from oozing out during the baking process so I cut each bar into 8 pieces.  Worked like a charm! 
     A word of caution: make sure you have plenty of milk on hand when consuming.

Milky Way Cookies
  • 2 sticks butter, softened
  • 3/4 cup sugar
  • 3/4 cup brown sugar
  • 2 eggs
  • 1 tsp vanilla
  • 2 3/4 cups flour
  • 1 tsp baking soda
  • 1/2 tsp salt
  • 35 mini Milky Ways, coarsely chopped

1.  Preheat oven to 350 and line cookie sheet with parchment paper.  In large bowl cream butter and sugars until light and fluffy.  Beat in eggs and vanilla until well combined

2.  In a separate bowl combine the flour, baking soda and salt.  Slowly add the flour mixture to the wet ingredients along with the chopped Milky Ways.

3.  Drop dough by tablespoonful onto cookie sheet; bake for 9-11 minutes or until cookies are lightly browned.  Cool for 2 minutes before moving to wire rack.  Enjoy!

February 26, 2013

Baked Ravioli


     Hello!  This recipe comes from the Tasty Kitchen website (here).  Aaron and I are always looking for quick but delicious recipes to make for weeknight dinners and when I stumbled upon this one I knew we had to try it.
    The original recipe calls for frozen raviolis but I opted to use fresh Buitoni raviolis.  At our local grocery store a 20oz package sells for around $6 but Aaron and I feel the splurge is well worth it.  Keeping in mind that the raviolis were not frozen I took 10 minutes off the initial bake time. 


Baked Ravioli

  • 1 bag (25 oz) frozen ravioli or 1 20 oz package fresh ravioli
  • 1 jar of your favorite pasta sauce
  • 2 cups shredded Mozzarella cheese
  • Shredded Parmesan cheese, for sprinkling on top.

1.  Preheat oven to 400.  If using a glass baking dish, spray bottom with cooking spray.

2.  Spread 3/4 cup of pasta sauce on bottom of baking dish. Arrange ravioli in single layer over bottom of baking dish; top with pasta sauce and Mozzarella cheese.  Repeat layers until there are no more ravioli. Top with shredded Parmesan.

3.  Cover with aluminum foil and bake for 30 minutes (if frozen).  Remove foil and bake for an additional 10 minutes or until cheese is bubbly and brown.  Let stand 10 minutes before serving.  Enjoy!


February 19, 2013

Zuppa Toscana Soup

     Hello!  Today's recipe was passed along to me by a parent of one of my students and originated from the blog Two Peas & Their Pod (here).  While I've been to the Olive Garden too many times to count, I've never tried their Zuppa Toscana.  Aaron, on the other hand, has and says this recipe is WAY better than the O.G. (shh, don't tell them!).
     I will warn you... If you follow the recipe and add the 1 1/2 tsp of red pepper flakes there's going to be some heat.  I'm talking burn your lips and tongue-reach for a glass of milk and a loaf of bread heat.  We cut back to 1/2 tsp of flakes and even then I thought it was a bit spicy.  Aaron did not.
     While the recipe doesn't specify, I'm not a fan of spicy or hot sausage so I opted to use sweet sausage.  Aaron didn't seem to mind the sweet and I thought it complemented the red pepper flakes perfectly.  The soup is hearty but not too thick and tastes great reheated, which is good because it makes big potful!

Zuppa Toscana Soup

  • 1 pound Italian sausage
  • 1 1/2 tsp red pepper flakes (use caution if you don't like heat)
  • 1 large white onion, diced
  • 4 slices bacon, chopped
  • 3 cloves garlic, minced
  • 8 cups chicken broth
  • 2 cups water
  • 1 cup heavy cream
  • 3 large Russet potatoes, peeled and chopped
  • 3 cups kale, washed and roughly chopped
  • Salt and pepper, to taste

1. In a medium skillet, saute the sausage with the red pepper flakes.  Drain the excess fat, set aside.

2. In a large soup pot, sauté the bacon.  When the bacon is half way cooked, add the onions and garlic.  Sauté until the onions are tender, about 5 minutes.

3. Add the chicken broth and water; bring to a boil.

4. Add the potatoes and cook until soft, 20-30 minutes.

5. Add the heavy cream and sausage and cook until the soup is heated through.

6. Stir in the chopped kale.  Season with salt and pepper and serve hot.  Enjoy!


February 12, 2013

Strawberry Chocolate Chip Cookies


     Shut. The. Front. Door.  Strawberry and chocolate in a cookie?! This incredibly delicious and super easy recipe comes from Sally's Baking Addiction (here).  I'll admit that the only reason I wanted to try this recipe was because the cookies were pink.  Yes, pink.  I'm a girl, what can I say?
     Besides being pink, the cookie is puffy, soft and has just the slightest hint of strawberry flavoring.  The semi-sweet chocolate adds a nice touch... They practically melt in your mouth and I feel comfortable saying that there will be very few left overs, if any, when you serve them.  Even the boys will want to eat the pink cookie! 
     Wouldn't these be perfect for Valentine's Day?! 

Strawberry Chocolate Chip Cookies

  • 1 box strawberry cake mix (like Duncan Hines)
  • 1 tsp baking powder
  • 2 eggs
  • 1/3 cup oil
  • 1/2 tsp vanilla extract
  • 1 1/4 cup semi-sweet chocolate chips

1.  Preheat oven to 350 and line cookie sheets with parchment paper.  In medium sized bowl combine the cake mix and baking powder.  Set aside.

2.  In a separate bowl combine eggs, oil and vanilla extract.  Slowly stir in cake mixture and blend until a thick dough forms.  Add chocolate chips.

3. Drop dough by tablespoonful onto baking sheet.  Bake for 10 minutes.  Cool for 3-5 minutes before moving to wire rack.  Enjoy!  


February 5, 2013

Ooey Gooey Chocolate Cookies

     
     Hello!  The title of this post says it all - these are incredibly ooey gooey cookies!  The original recipe came from Lil' Luna's blog (here) via Pintrest (where else?).  While they do take a bit of time to assemble they are definitely worth it!  The cookie is soft with just a bit of tang from the cream cheese and the center is sooo gooey from the Rolo candy.  
Make sure Rolo is completely covered by dough
     To create the cookie balls and keep them uniform in size I used a Pampered Chef scoop (I love that thing!).  When inserting the Rolo into the dough I found that the dough was getting a bit sticky after several minutes and refrigerated the dough when it wasn't in use. 
     The original recipe says to bake cookies for 10-12 minutes but I found 12-14 minutes was a better fit for my oven.  And when cooling I made sure to have a piece of parchment paper or aluminum foil underneath the wire rack to catch any of the caramel drips (there were a few).
     While I'll eat cookies at any time, I recommend eating these the day of baking... I served them at a Stampin' Up! workshop the day after baking and found them to be a bit chewier than the previous day, but they were still delicious!

Ooey Gooey Chocolate Cookies

  • 1 box chocolate cake mix
  • 1/2 cup butter
  • 1 tsp vanilla
  • 8 oz cream cheese
  • 1 egg
  • powdered sugar
  • Rolos chocolate candies

1.  Preheat oven to 350.  Cream together butter, vanilla and egg until light and fluffy.

2. Mix in cake mix.

3. Chill in refrigerator for 30 minutes.

4.  Insert Rolo into a ball of cookie dough, making sure the candy is completely covered by dough.  Roll cookie dough ball in powdered sugar and place on cookie sheet. Refrigerate dough for 10 minutes if it becomes sticky.

5.  Bake for 10-12 minutes.  Cool for 5 minutes on cookie sheet before transferring to wire rack.  Enjoy!


December 11, 2012

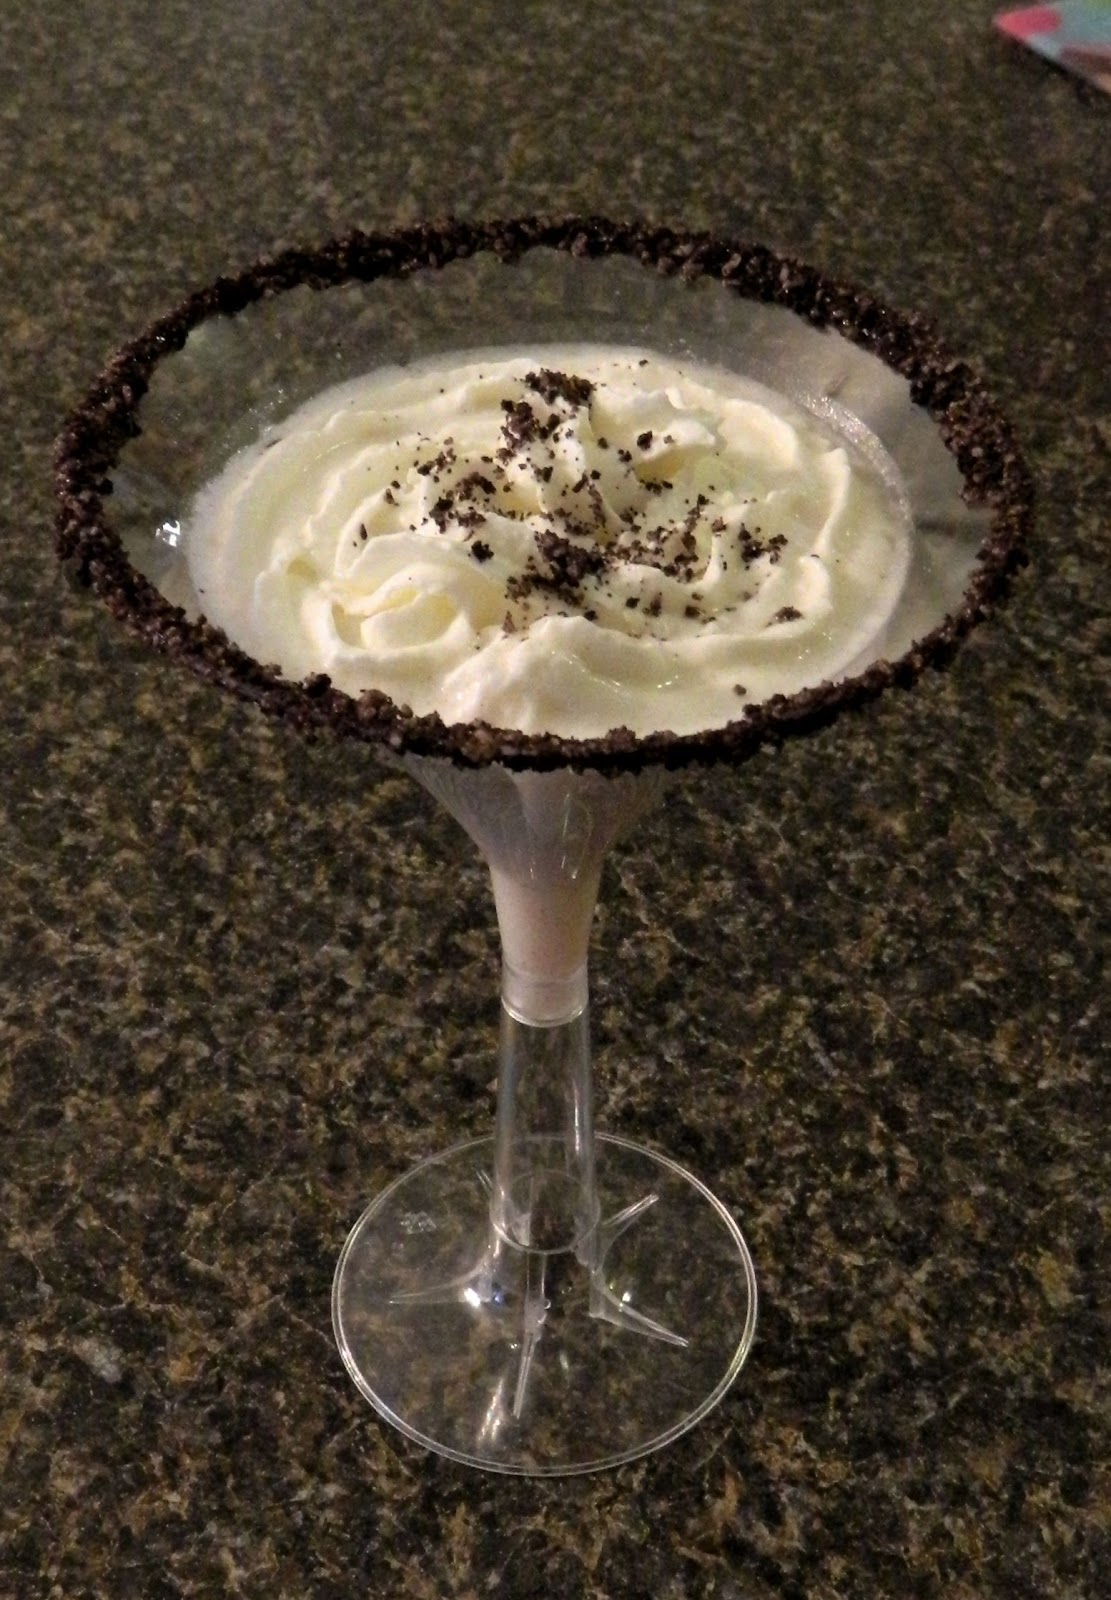
Oreo Martini

      Hello!  Looking for an adult drink to serve at your Christmas party this season?  Look no further - I've found it!  And you'll be happy to know that I've already taste tested this concoction (several times) and I can personally guarantee that it not only tastes delicious but it will be in instant hit at your gathering.  
    The recipe calls for Pinnacle Whipped Vodka which I found easier to locate in the liquor store than the JELL-O Oreo pudding mix.  I looked behind every single box of pudding mix in that aisle and eventually conceded that my grocery story was out of the all-important Oreo mix... So I substituted white chocolate pudding mix and to be honest you'd never taste the difference (just add a few Oreo crumbs to the shaker and you're good to go).   
     You can make this drink semi-skinny by using skim milk rather than full fat milk or cream.  The drink comes out a little thinner and tastes about the same, just a little less creamy.  But really,  who sticks to their diet during the holidays anyways?!  If you're going back for a second helping of dinner or dessert at a party you might as well go all the way and have the full-fat martini... 
     And one more thing... keep in mind that this is definitely a sipping drink!

Oreo Martini (1 drink)

  • 1/3 cup milk or cream
  • 1/4 cup Pinnacle Whipped vodka
  • 1 1/2 tsp JELL-O Oreo or white chocolate instant pudding mix
  • Chocolate syrup
  • Crushed Oreo's
  • Whipped cream


1. Mix milk/cream, vodka and instant pudding mix in shaker container with ice.  Shake for 30 seconds.
2. Dip rim of glass in chocolate syrup, then in Oreo crumbs.
3. Strain drink into glass, top with whipped cream.  Enjoy!

December 4, 2012

Butterscotch Glazed Cookies


     Hello!  Today's recipe comes from Bakeat350.blogspot.com (here).  If you've never been to Bridget's blog I highly recommend it, she's so talented!  I wish I had the patience and dedication to cookie decorating that she does!
     I have to clarify one thing... Bridget calls her cookies "Butterbeer Cookies", not butterscotch glazed cookies.  When I brought them into school for my coworkers I had waaay too many questions about what kind of beer I added to the glaze and had to explain at least 15 times that there is no beer in the glaze or the cookies.  So I changed the name.  But that's all I changed. 
    I tried to make mine look pretty, in the shape of a pumpkin and a leaf, but once I got the gooey glaze on they turned into brown blobs.  But they are so buttery good that after one bite I don't think anyone will mind how they look!

Butterscotch Glazed Cookies

  • 3 cups all-purpose flour
  • 2 tsp baking powder
  • 1/2 granulated sugar
  • 1/2 cup light brown sugar, packed
  • 2 sticks butter
  • 1 egg
  • 1 tsp butter flavoring
  • 3/4 tsp vanilla extract

.
1.  Preheat oven to 350, line cookie sheets with parchment paper. 

2.  Cream butter and sugar.  Add egg, butter flavoring and vanilla extract; mix well.

3.  Gradually add flour and baking powder and beat until just combined (the dough will be very thick at this point).

4.  Roll dough on a floured surface to about 1/4" thick and cut into shapes.  Bake for 9-12 minutes, depending on thickness of cookie.  Let cool for 2 minutes then transfer to a cooling rack.

Butterscotch Glaze

  • 2/3 cup butterscotch chips
  • 1/8 cup evaporated milk
  • 1 tbsp corn syrup
  • pinch of salt

1.  Place all ingredients in a double boiler with simmering water.  Heat until completely melted.

2.  Place cookies on wire cooling rack and pour glaze over cookies.  You may want to spread the glaze with a knife for even distribution.  Enjoy!

**I doubled the glaze recipe to make sure I had enough to cover the 2 dozen cookies.  There was a bit left over for "taste testing".


November 27, 2012

Peanut Butter Cup Chocolate Cookies

   
     Hello!  Today's recipe come from the amazing blog, Cookies and Cups (here).  I love peanut butter cups and I love chocolate so what's not to love about this recipe.  Oh, did I mention that there are only 4 ingredients?!
     These cookies look and taste like you spent all day baking but no one has to know that these take less than 15 minutes to prepare!  Even though the cookie is made with a cake mix the cookie is soft but not "cakey".  The mini peanut butter cups break up when you're mixing the batter letting little gobs of peanut butter melt thought the cookie.  
     And can I just say that after tasting just one cookie, I decided that this batter will be the batter I use for all chocolate cookies.  It was SO simple!  Just imagine substituting the peanut butter cups with chocolate chips and walnuts.  Or you could try white chocolate chips and macadamia nuts... Or how about Andes mint candies?  Oh, the possibilities are endless!


Peanut Butter Cup Chocolate Cookies


  • 1 pkg chocolate cake mix
  • 2 eggs
  • 1/3 cup vegetable or canola oil
  • 8 oz mini peanut butter cups (caution: these are easy to eat by the handful!)
1.  Preheat oven to 350.  Line cookie sheet with parchment paper.

2.  Using mixer, combine first three ingredients.  Add mini peanut butter cups and mix until incorporated (batter will be thick and peanut butter cups will break apart).

3.  Drop by rounded tablespoon on cookie sheet.  Bake for 8-9 minutes.  Cool on cookie sheet for several minutes before moving to wire rack.  Enjoy!


November 20, 2012

Peanut Butter & Fluff Brownies


     Uh, I believe these are the best tasting brownies I've ever made or eaten.  How could they be bad when there's peanut butter (I'm sure you're aware of my love of all things peanut butter), fluff all on a chocolate brownie - why didn't I think of this years ago?!
    Aaron and I were a little bored during Hurricane Sandy a few weeks back so why not grab a glass of wine and whip up a batch of brownies?!  We had a box of brownie mix, tons of peanut butter (thanks to Aaron stocking up for the hurricane) and some Fluff that was just begging to be used.
     These brownies are incredible.  The peanut butter and fluff mixture has slightly crunchy crust but is soft and chewy underneath.  I prefer boxed brownies that are "fudge-y" and used an 8x8 brownie pan to ensure that this batch was dense and moist.  While these taste great at room temperature Aaron highly recommends serving warm with a scoop of vanilla ice cream!

Peanut Butter & Fluff Brownies

  • 1 box brownie mix
  • 1 cup smooth peanut butter (full fat)
  • 1 - 1 1/2 cup Fluff


 1.  Preheat oven and prepare brownies according to box directions.  Pour batter into 8x8 pan.

2.  In microwave-safe bowl, combine peanut butter and Fluff.  Microwave until soft, approximately 20-30 seconds.  Gently mix together ingredients, making sure not to fully combine (you'll want to see the colored swirls).  Carefully pour peanut butter mixture over brownies, swirling with knife.

3.  Bake brownies according to box directions.  Let cool for 1 hour.  Slice and serve with a dollop of ice cream.  Enjoy!


November 13, 2012

Pumpkin Coffee Cake with Brown Sugar Glaze


     Oh, dear... I'm beginning to think that just about anything tastes better with pumpkin.  Pumpkin whoopie pies, pumpkin cookies, pumpkin muffins and now pumpkin coffee cake.  
     Today's recipe comes from the blog PrettyGoodFood.com (here) by way of Pintrest.  Why is it that whenever I look for one thing on Pintrest I end up finding 15 other things that I didn't know I needed but can quickly convince myself that I can't live without.  I'm pretty sure it's impossible to spend less than an hour on that site.
    But I digress, back to the cake...I knew I had to make this recipe the instant I saw the crumbly, gooey topping.  And there's a bonus: it's made with boxed cake mix so it's going to be quick to make!
    This has to be the moistest, most flavorful coffee cake I've ever eaten!  The pumpkin cake is sweet, but not too sweet, while the brown sugar glaze and crumble topping provides the sweetness and practically melts in your mouth. This is definitely not a breakfast food, more of a dessert. 
     No, wait.  
     Pumpkin is technically a fruit so you could eat this for breakfast if you really wanted to.  And if you wanted to make it even more healthful, add some walnuts to the crumble topping...   

Pumpkin Coffee Cake

  • 1/3 cup water
  • 1 can pumpkin puree (15 oz)
  • 2 eggs
  • 1 tbsp vanilla extract
  • 2 tsp pumpkin pie spice
  • 1 box yellow cake mix
  • 1 tsp baking soda
  • 1 cup brown sugar, divided
  • 1/2 flour
  • 4 tbsp butter, melted
  • 1/4 cup granulated sugar
  • 1 tsp vanilla extract
  • 1/4 cup heavy whipping cream

1.  Preheat oven to 350, grease 9x13" pan.

2.  In large bowl mix together water, pumpkin, eggs, 1 tbsp vanilla extract and pumpkin pie spice until well combined.  Add cake mix and baking soda until just combined.  Pour batter into greased pan.

3.  In small bowl combine 1/2 cup brown sugar, flour and melted butter.  Use your fingers to crumble mixture on top of batter.

4.  Bake for 25-30 minutes, or until toothpick comes out clean.  After cooling for 10-15 minutes poke holes with toothpick or knife in top of cake.

5.  For glaze, combine remaining brown sugar, granulated sugar, vanilla extract and heavy whipping cream in a saucepan and bring to a simmer.  Remove from heat and stir until sugar is dissolved.  Pour glaze over cake, making sure to cover all areas.  Enjoy!


November 6, 2012

Crunch Top Apple Pie


     Hello!  Today's recipe comes from Paula Deen by way of FoodNetwork.com (here).   Aaron and I took another trip up to Carter Hill and since their specialty is apples we picked up another  1/2 peck.   They also specialize in these ah-mazing apple filled cookies but I haven't quite figured out their recipe or how they fill the cookies.  We bought two bags of cookies so I could do some "research" on this.  No luck on their recipe yet but I'll keep you posted!
     This week I was looking for an apple dessert with a twist.  Not quite a pie and not quite a crisp.  I found just what I was looking for in Paula's recipe.  The unique ingredient of applesauce gives the pie a smooth texture without adding too much sweetness.  Paula's recipe calls for a lattice crust top in addition to the crumb topping but I'll be honest and say I was feeling a bit on the lazy side and decided to omit that part.  While we absolutely love this recipe I think the next time I make this I'll be adding some chopped walnuts to crunch topping for a little added crunch.  And maybe then I'll give the lattice crust a try!       

Crunch Top Apple Pie

  • Frozen pie crust
  • 3/4 cup sugar
  • 1 tbsp all-purpose flour
  • 1 tsp cinnamon
  • 3 1/2 cups peeled, sliced apples
  • 1 cup applesauce
  • 1 tbsp lemon juice

Crunch Topping

  • 3 tbsp all-purpose flour
  • Dash of salt
  • 1 tbsp sugar
  • 1 tbsp butter, room temperature
  • 1/2 cup quick-cooking oats


1.  Preheat oven to 425.  Combine sugar, flour, cinnamon, apples, apple sauce and lemon juice in bowl.  Spoon the apple mixture into pie crust and dot with butter.

2.  For crunch topping, combine flour, salt, sugar, and oats.  Using a fork cut in butter until mixture is crumbly.  Sprinkle over apples. 

3.  Bake for 10 minutes.  Reduce heat to 350 and continue to bake for 45-50 minutes or until topping is golden brown.  Let cool for at least 15 minutes.  Serve with a scoop (or two) of vanilla ice cream.  Enjoy!    


October 23, 2012

Homemade Apple Crisp


     Hello!  My normal "homemade" apple crisp consists of apples and a box of Concord Foods Apple Crisp mix.  You know, the one in the red box that's always hanging around the apple section of the food store.  But after a trip to our favorite apple orchard, Carter Hill, and a little research on the internet, I decided to make apple crisp from scratch.  
     This recipe comes from Taste of Home (here) and is super easy to prepare.  The original recipe calls for 10-11 cups of sliced apples - yikes!  Since I'm not feeding a small army, I decided to scale down the amount of apples and went with 5 large apples, sliced.  I prefer my apples to be tender, almost on the mushy side so I let the crisp bake for a full 60 minutes. 

     According to Aaron, this is the best apple crisp I've ever made and I'd have to agree.  The apples are tender and juicy while the crumb topping is buttery and slightly crunchy. Each of us went back for a second helping!  And there's a bonus to baking with apples - you get that wonderful apple smell wafting through the house!  

Easy Apple Crisp

  • 5-6 large apples, sliced
  • 1/2 cup sugar
  • 1 tsp cinnamon, divided
  • 1 cup all-purpose flour
  • 1 cup packed brown sugar
  • 1/2 cup quick-cooking oats
  • 1 tsp baking powder
  • 1/4 tsp ground nutmeg
  • 1/2 cup cold butter cubed

1.  Preheat oven to 375.  Toss apples, sugar and 1/2 tsp cinnamon in large bowl.  Place apples in 13"x9" baking dish.

2.  Combine flour, brown sugar, oats, baking powder, nutmeg and 1/2 tsp cinnamon; cut in butter until mixture is course and crumbly (feel free to use your hands to do this!).

3.  Sprinkle mixture over apples.  Bake for 50-60 minutes or until apples are tender.  Let cool for at least 15 minutes, serve with a scoop of vanilla ice cream.  Enjoy!


October 16, 2012

3 Ingredient Pumpkin Cookies

     O.M.G.   These cookies are incredible!  I found the original recipe on a delicious blog, Cookies and Cups (here) and thought I'd give it a try.  
     You might remember that last year at this time there was a canned pumpkin shortage due to summer droughts in the mid-west.  Not being able to make my famous pumpkin whoopie pies made for a very looooong fall and winter.  This year, however, our local grocery store is well stocked with Libby's Pureed Pumpkin and I was able to stock up this weekend.  The cashier did give me a funny look when I placed 10 cans at the register but you never know when there will be another pumpkin shortage (especially if this recipe catches on)! 
     There are literally three ingredients in this recipe.  I think it took me longer to get out and assemble the hand-mixer than it did to prepare the batter.  Shelly recommended topping the cookies with buttercream frosting.  She happened to have leftover homemade frosting in her fridge, I happen to be good friends with Betty Crocker and she let me use hers.  You can certainly leave them unfrosted but really, who would want to?!   

3-Ingredient Pumpkin Cookies

  • 1 box cake mix (I used yellow)
  • 1 can (15 oz) pumpkin
  • 1 tbsp pumpkin pie spice


1.  Preheat oven to 350.  Line cookie sheets with parchment paper.

2.  Mix 3 ingredients in medium bowl until lump-free (I used a hand mixer but you can mix with a spoon).

3.  Drop by rounded tablespoon onto cookie sheets.  Bake for 15-17 minutes.

4.  Allow to cool completely on wire rack before frosting.  Enjoy!


October 2, 2012

Dutch Apple Cake


     Hello!   Today's recipe is one I found on the Taste of Home website (here) It's apple season and once Aaron brought home a peck of apples from Carter Hill Orchard (here) I knew I'd be baking with them!
     Dutch Apple Cake is incredibly moist and dense, it almost has the density of a pound cake.  I used Macintosh apples and found that the apples almost melted into the loaf after baking.  Absolutely delicious!
     This recipe is quick and simple to make but does take a while to bake.  The apples must be cut and allowed to sit in cinnamon and sugar for an hour before the batter is prepared.  Also, the original recipe says to bake it at 300 for 1 1/2 to 1 3/4 hours but I ended up baking mine for over 2 hours! 


Dutch Apple Cake

  • 3 medium, tart apples peeled and cut into 1/4" slices
  • 3 tbsp plus 1 cup sugar, divided
  • 1 tsp cinnamon
  • 2/3 cup butter, softened
  • 4 eggs
  • 2 cups flour
  • 1 tsp vanilla
  • 1/8 tsp salt

1.  In large bowl combine apples, cinnamon and sugar; let stand for 1 hour

2.  Preheat oven to 300.  In another bowl, cream butter and sugar until light and fluffy.  Add eggs, one at a time, beating well after each addition.  Add vanilla.  Combine flour and salt; gradually add to creamed mixture and blend until smooth.

3.  Transfer batter to a greased 9x5" loaf pan.  Push apple slices vertically into batter, placing them close together.

4. Bake loaf for 1 1/2 to 1 3/4 hours, or until toothpick inserted near center comes out clean.  Cool for 10 minutes before removing from pan.  Serve warm.  Enjoy!


September 11, 2012

Shortbread

The dots on the chocolate is condensation from being
in the refrigerator.
     Hello!  I keep my favorite recipes and recipes that look like they might become a favorite once I get around to actually testing them in a 3 1/2" binder.  Several teachers hosted an "End of Summer/Happy New School Year" cookout a few weeks ago.   Being well-known around school for my delicious desserts I offered to bring one but, I needed something new.  Enter the binder.
     This recipe is one that I've had for over a year but never had a chance to try.  Teachers at school {love} my sugar cookies, which have a slightly shortbread-y taste, so I knew this would be a hit with them.  They are light in flavor but dense in cookie.  So buttery and so good.  Because they are a dense cookie I cut them in 1 1/2 x 2" pieces and one was more than enough to satisfy my sweet tooth (ok, maybe two).
    And yes, you're reading the recipe correctly... that's one pound of butter. 

Shortbread
1 pound butter, softened
1 1/4 cups confectioners' sugar
4 cups flour
2 tbs cornstarch
1/4 tsp pure vanilla extract
3/4 tsp almond extract

1.  Preheat oven to 325.  Using a stand mixer cream butter and sugar until light and fluffy.  Add vanilla. 

2.  In separate bowl combine flour and cornstarch.  Slowly add flour to butter mixture.  Mix well.

3.  Place batter in 10x14" baking pan, patting down firmly and evenly with hands (mixture will be a bit sticky).  Prick all over with fork.

4.  Bake for 22-25 minutes or until shortbread is pale golden color. Remove from oven and cut into rectangles immediately.  Cool on rack before removing from pan.
**Note:  If your pan is smaller than 10x14" you will need to add up to 5 minutes of additional baking time due to thickness of shortbread.

5.  If desired, dip shortbread pieces in melted chocolate and cool in refrigerator until chocolate sets, about an hour.  Enjoy!